DISCLAIMER: This guide suggests you already know your way around Blender and have basic knowledge about modding BGS games.
This guide was written with Robert S patching in mind, but it covers a lot of nuances and workarounds for general armor refitting, porting and/or creating from scratch. It has a lot of things you may already know, so you always can skip to a parts that are most important for you. :)
Blender 3.6.5: 3.6.5 is best version for SGB and guarantee for it to work. You can try 4.0+, but some things may not work, and it is not supported in general. 3.6. link (find 3.6.5 in a list and grab either portable or installer)
If you working with ported or scratch-made meshes, you can skip this
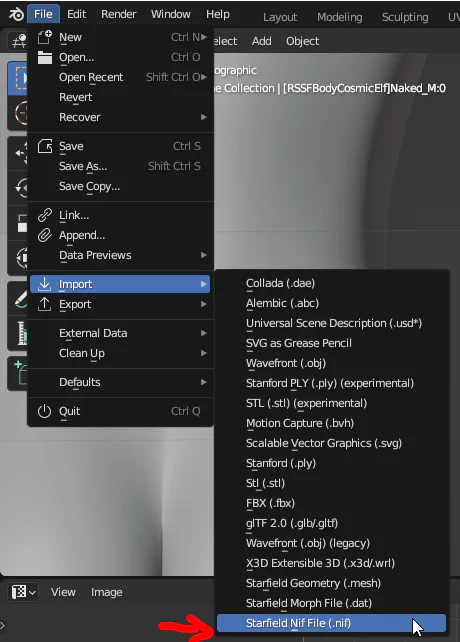
Open File -> Import -> Starfield NIF File
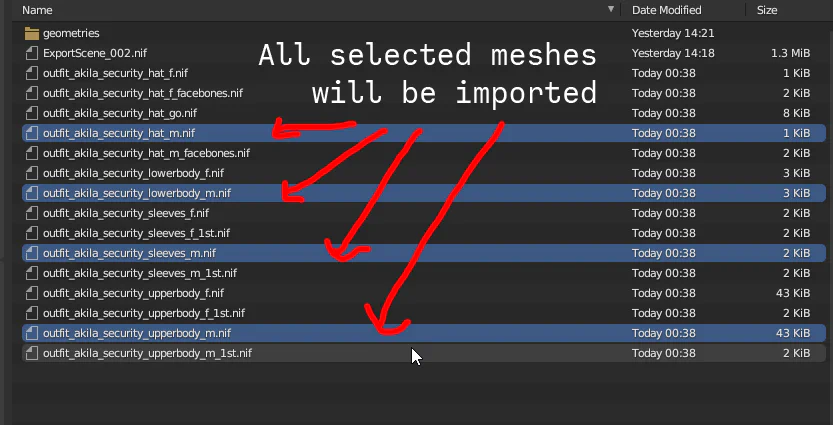
You can select few nif files at a time and it will import all of them, every one into it’s own collection.
ALWAYS tick “Load Havok Skeleton”. If mesh you importing contains cloth physics, it will export HAVOK skeleton that is essential for succesful mesh export!
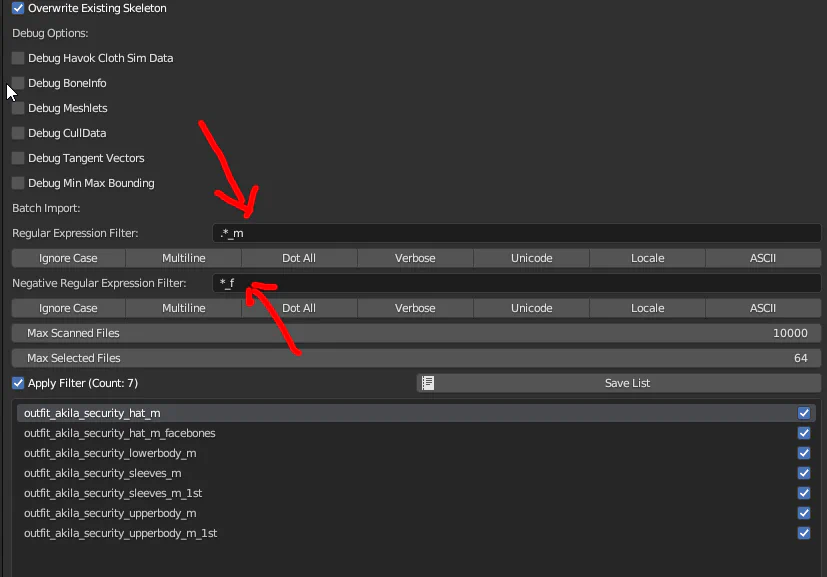
SBG import supports regular expressions. This means you can filter files of a whole meshes folder to find nifs with exact trait you want, and exclude ones you don’t want. For example, you can filter overall outfits folder by _m suffix and find all male outfit meses there. Then you can exclude _go, _hat, _1st suffix etc. and filter out only 3rd person body armor outfits parts. This allows you to very quickly find desired nifs, and combined with batch import it becomes unprecedently powerful tool for working with many armor pieces at once.
After import, mesh - or meshes - will appear in your .blend file.
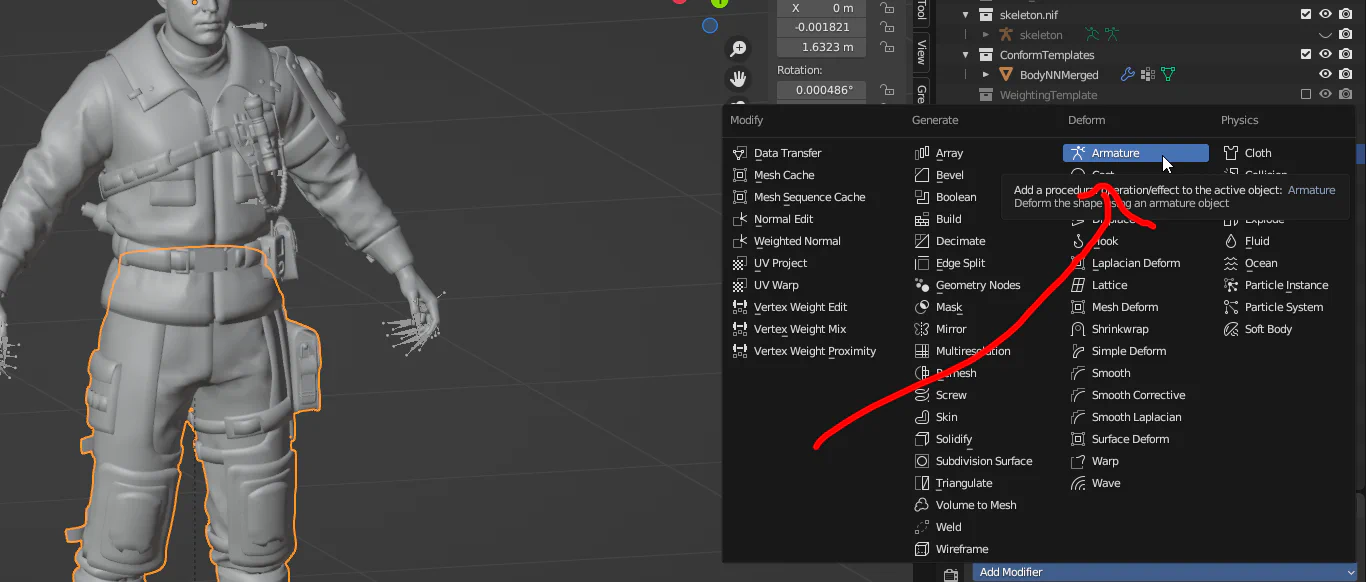
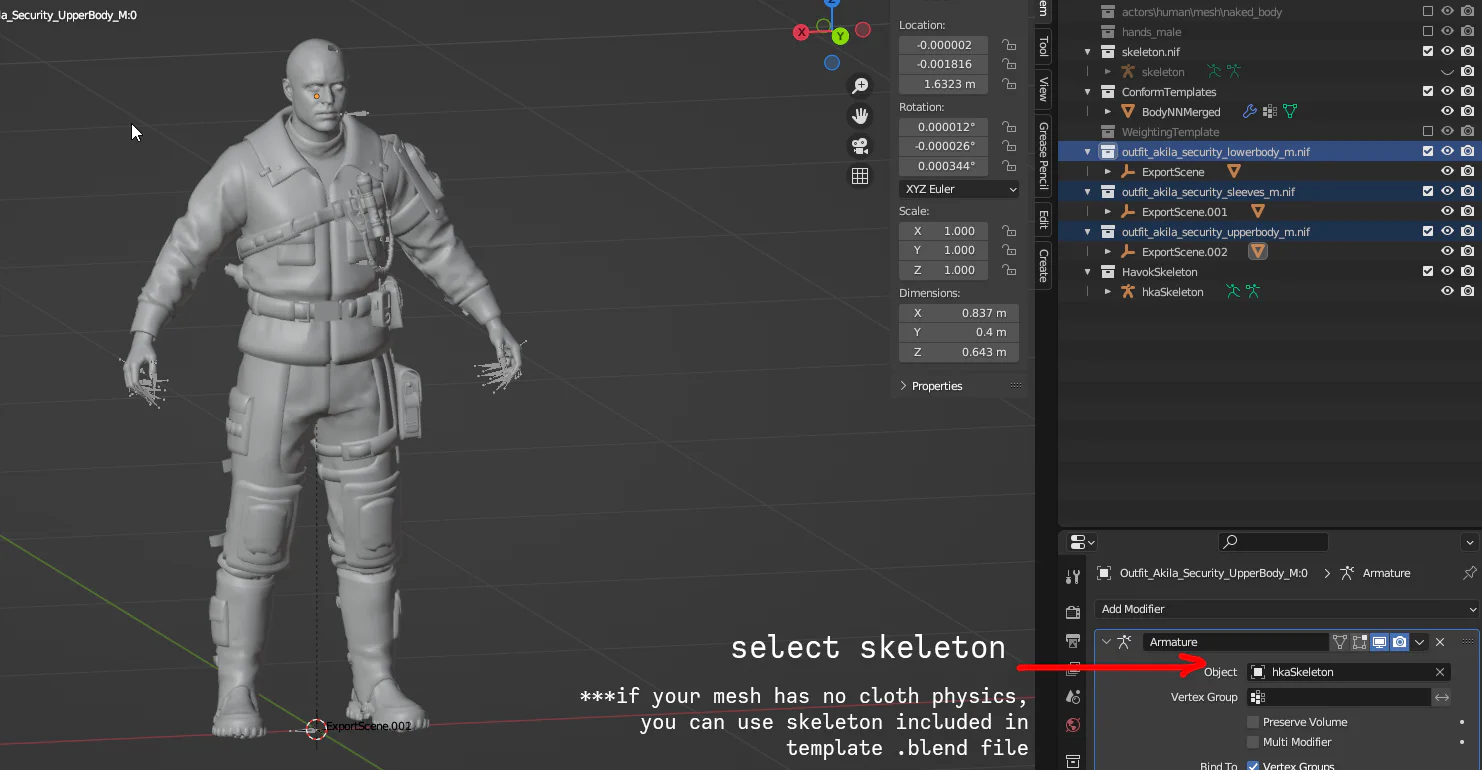
If you imported few meshes in one operation - attach Armature modifier to all the meshes that don’t have it (first one in selection row will always have it).
Generally, process of refitting, editing and/or rigging armor is not different form any other BGS game.
If you refit armor mesh for Robert S that has revealing skin, use Naked_M:0 as base for skin mesh.
Mesh parts behaving like they have “Shade Flat” setting when you edit them is normal. It is because SGB preserves original mesh vertex normals by applying auto smooth and custom normals during import. It will be correct after export. You can set smooth shading to meshes, but vertex normals quality will become a bit worse.
After you do all the modeling/weighting/cutting skin parts work, it’s time to transfer Robert S morphs to outfit parts.
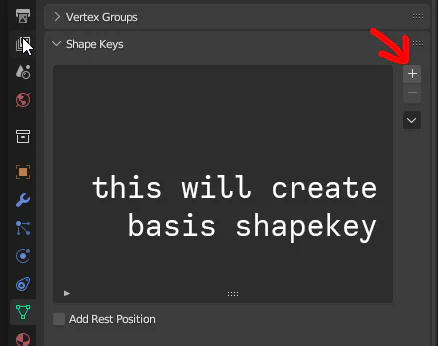
Add basis shapekey to every outfit part:
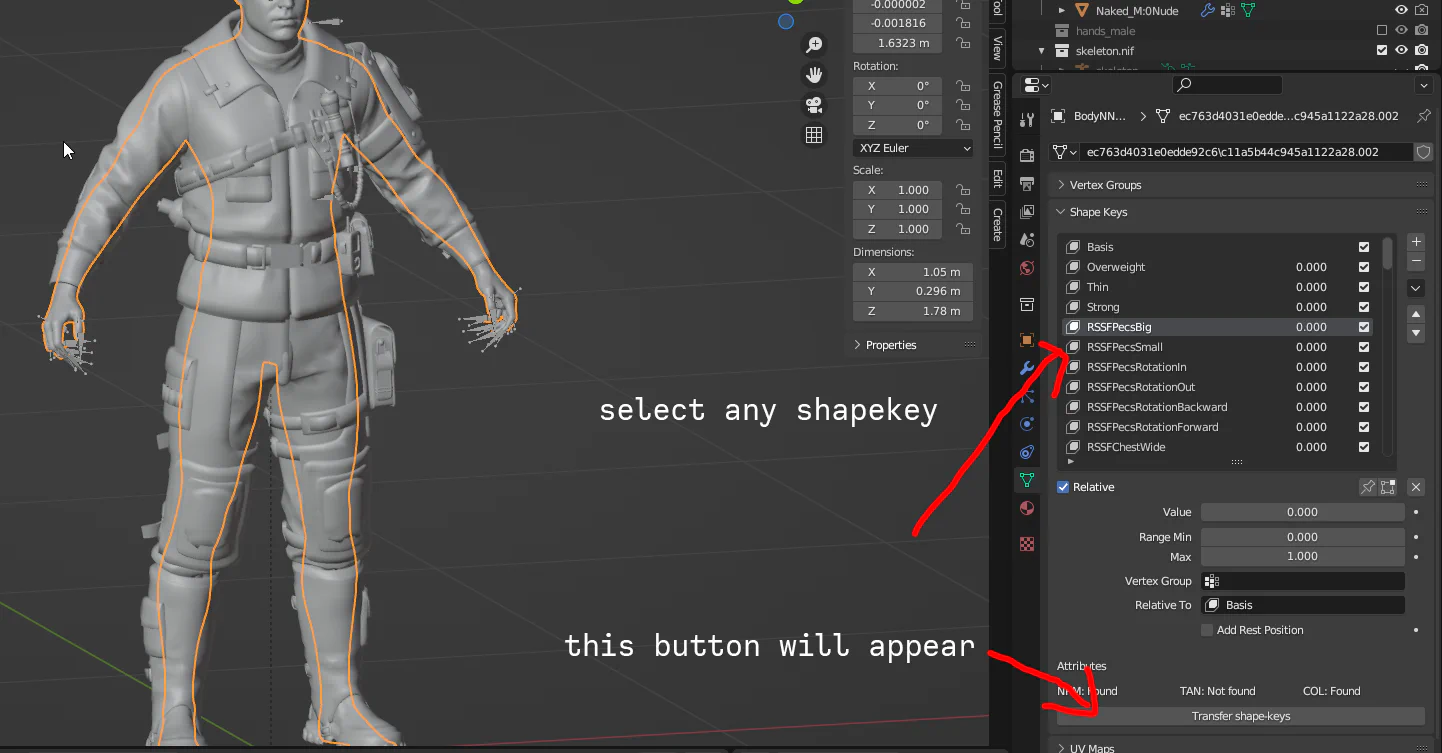
Select any shapekey EXCEPT Basis one on Reference mesh:
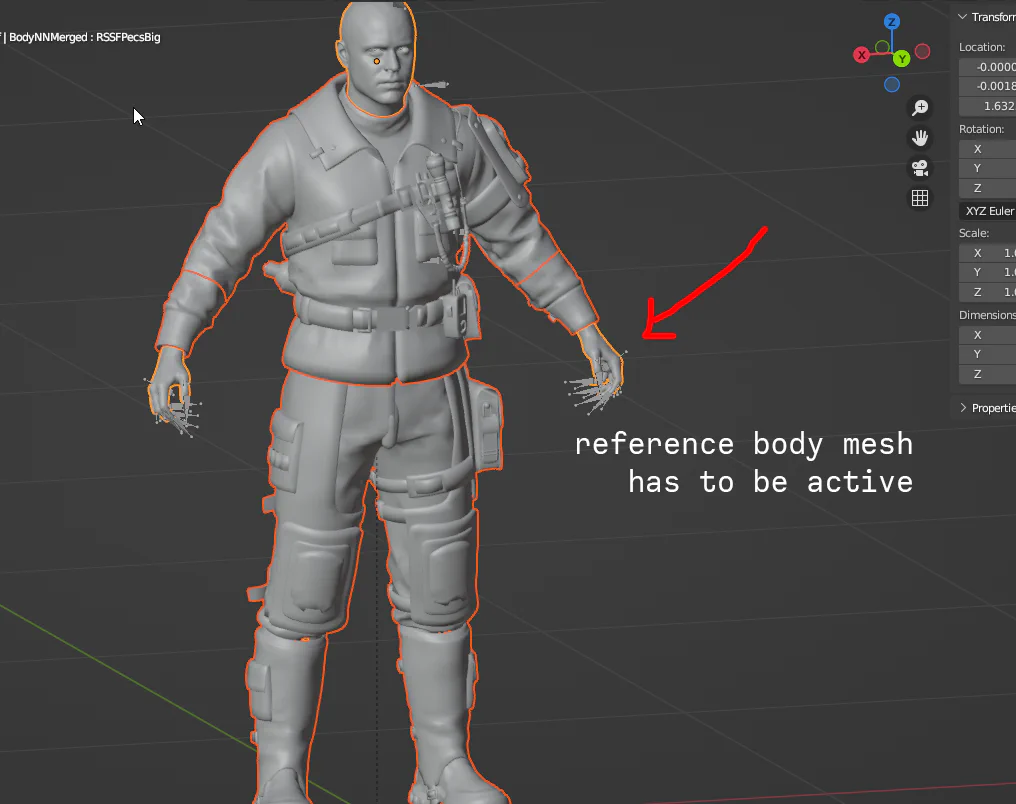
Select all your outfit parts. then select Reference mesh. Reference mesh has to be ACTIVE in your selection:
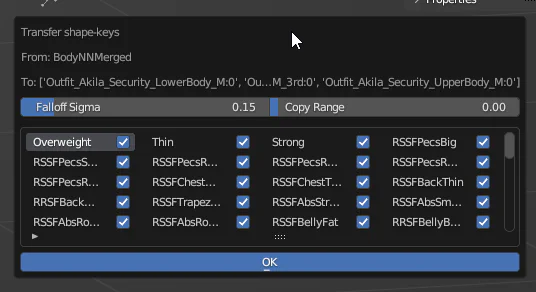
Click “Transfer shape-keys” button.
In most of cases you can leave default options.
More detailed Options description - quote of Sesame’s description:
The first value decides how further your base deformation can affect, same as falloff in blender.
The second value means if a vertex from target model is too close to a vertex from base model, the deformation will simply be copied. Setting the second value to infinite will simply mean every vert from target model just copies the deformation of their closest pair on base model. You don’t need to change that value a lot.
Click “OK”
All your outfit parts will have all Robert S Morphs as ShapeKeys now. Check how they behave and fix distortions for most extreme sliders if needed.
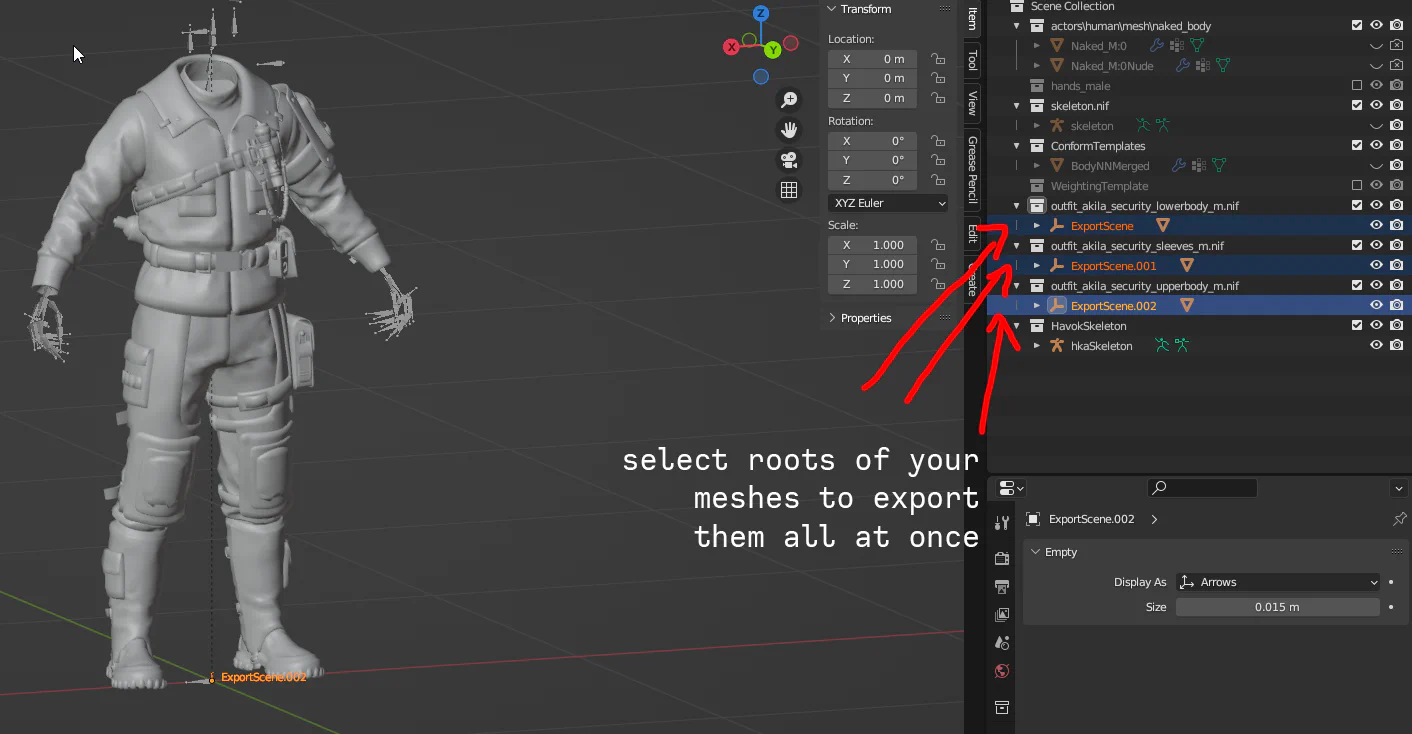
SGB supports batch export for your nif files. To export few meshes at once, select Root nodes “Export Scene” of all objects you want to export. Your .nif files will be called by collection names they belong to. When you use batch export, erase name of output file in export window completely, so SGB can name every file respectively.
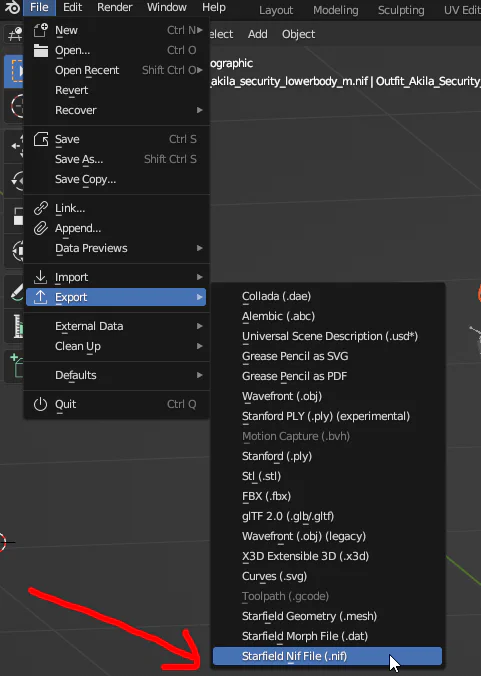
Go to File -> Export -> Starfield .Nif File
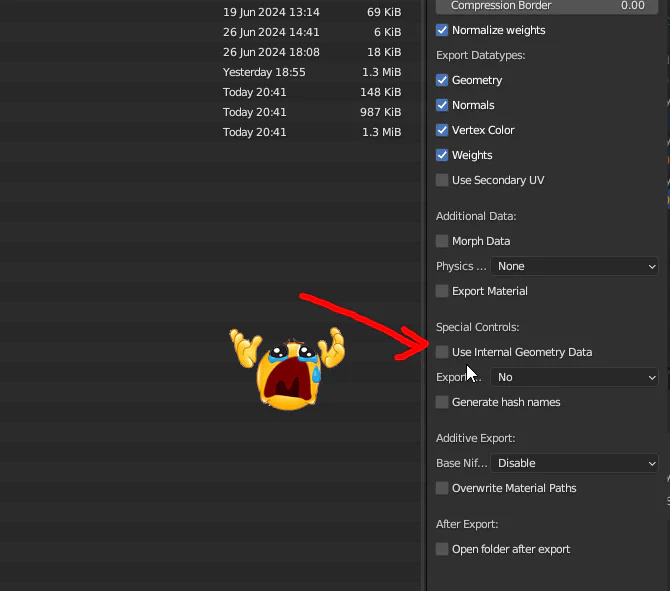
At this step you have to decide if you want to have your .nif’s as default external geometry, i.e. empty nif+.mesh file geometry, or you want to use internal geometry nif. Internal geo nif’s aren’t used by most of Starfield meshes, but as it turned out, it supports them perfectly fine, and saves lifetime of struggling.
For this guide to be objective, here’s short comprasion of the two:
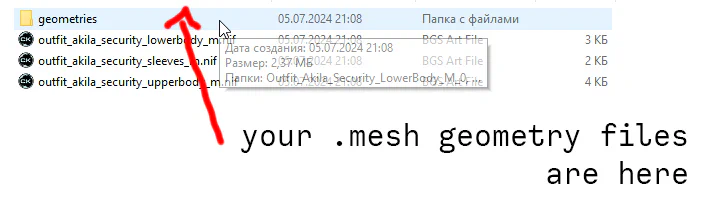
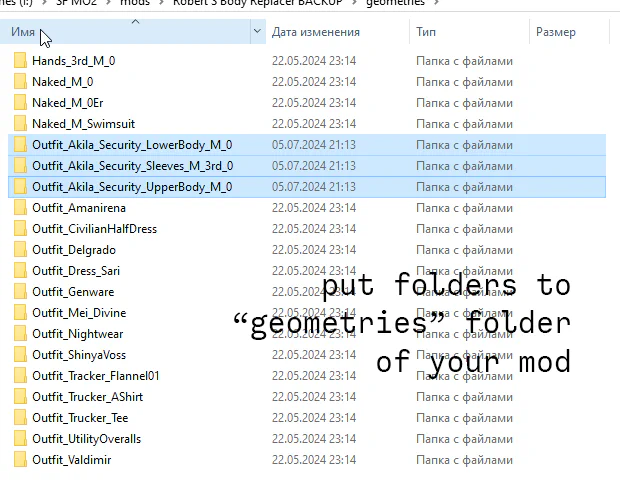
External geometry is considered to be 100% “safe” solution, the one game uses by default. You will have to deal with all the downsides of it though: your model shattered to two files, and changing any of them will cause issues. You have to always remember that your nif is not your mesh.
Internal Geometry is format that almost none of Starfield meshes use by default, but as it turned out, game does read them normally. Internal Geo mesh is your “old school” .nif, where you get everything in one file, so it’s handy, portable, easy to use and easy to understand.
While Internal Geo may be worse for some types of meshes, for ex. ones that have LOD data, it appears that for clothing meshes there shouldn’t be any difference, as they do not have LOD or other traits that may cause issues with internal geo.
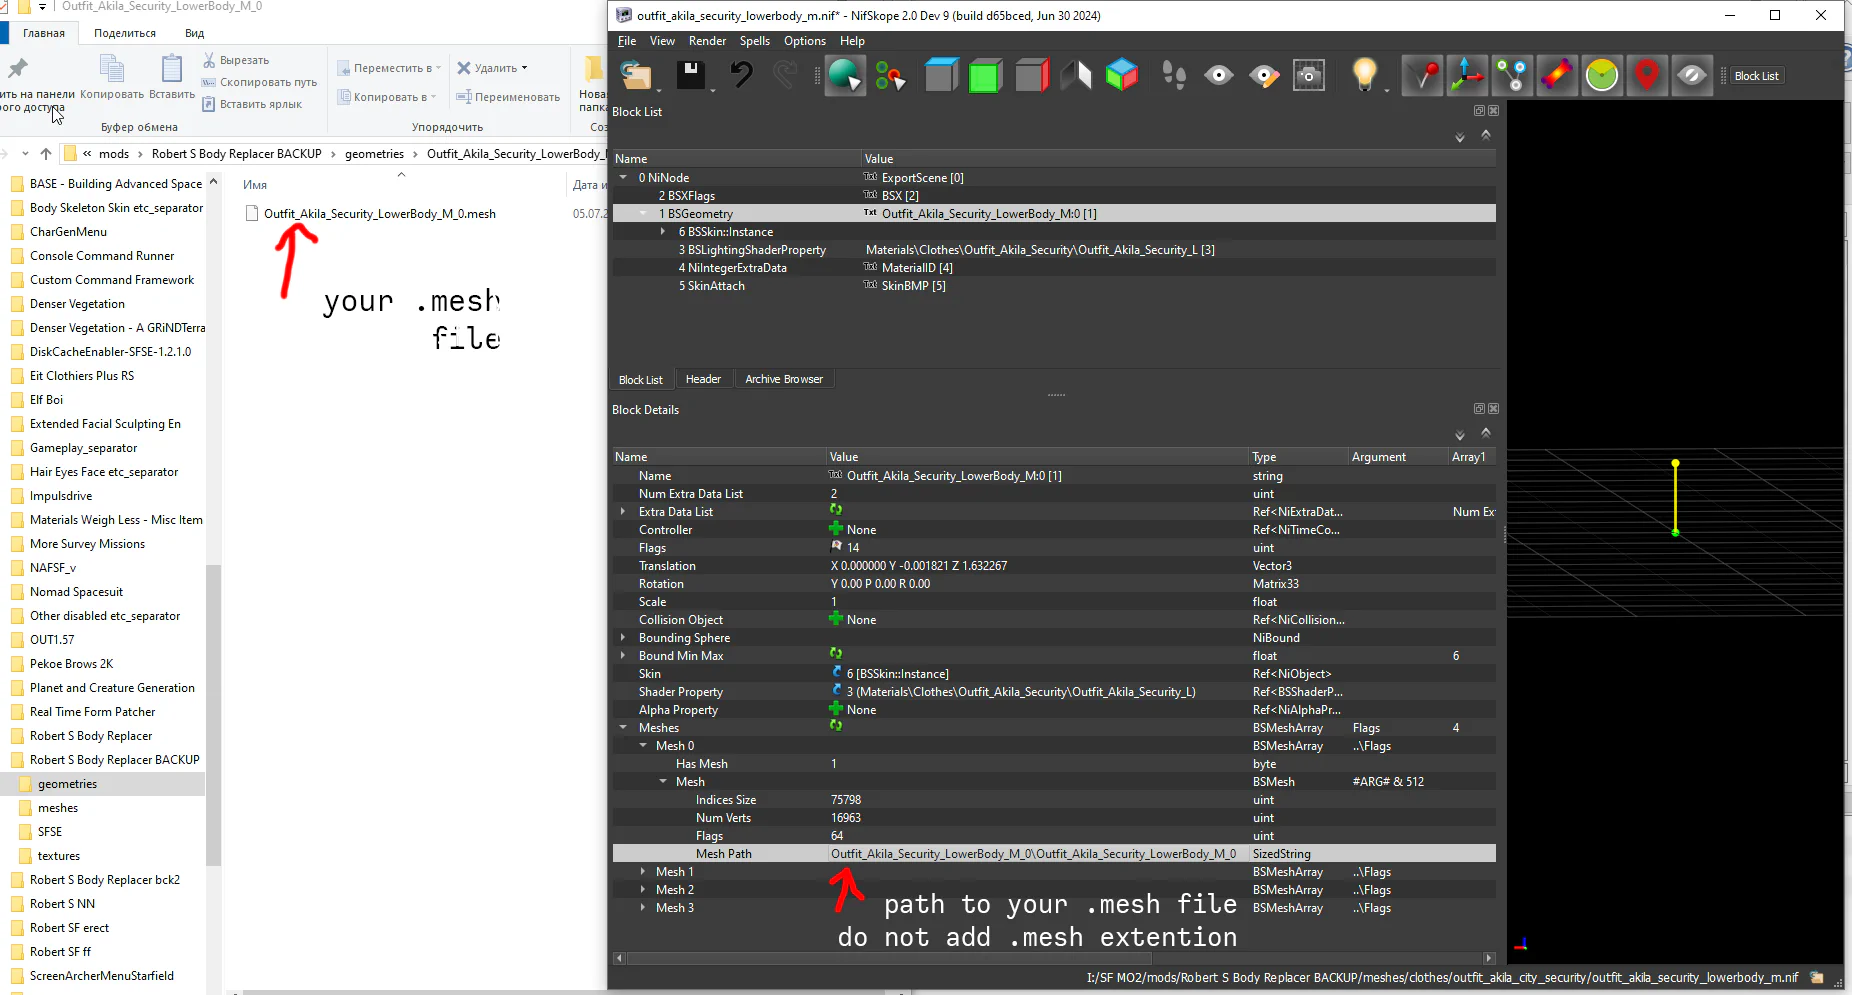
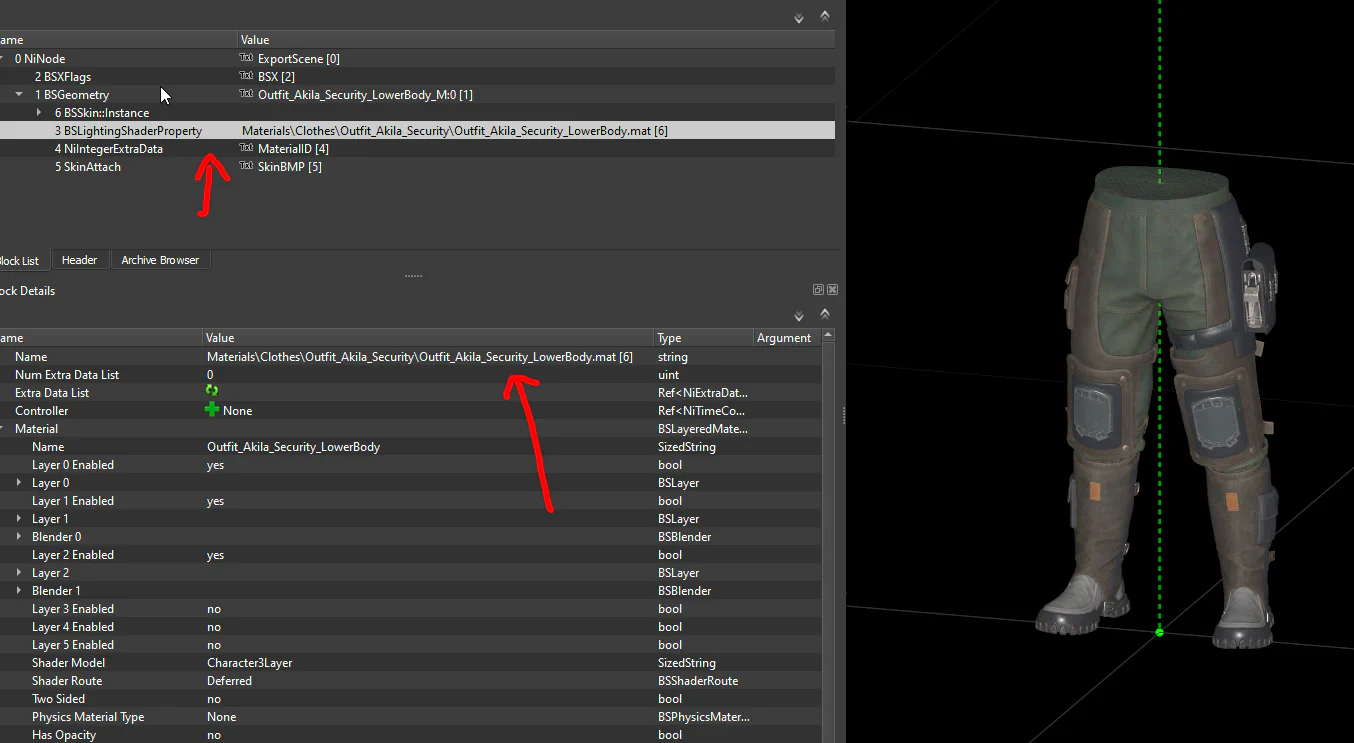
If material path is too long, SGB tentds to cut it off, causing mesh to have incorrect material path and, as result, not show up in game.
To fix it, go to BSGeometry -> BSLightingShaderProperty and check it’s name:
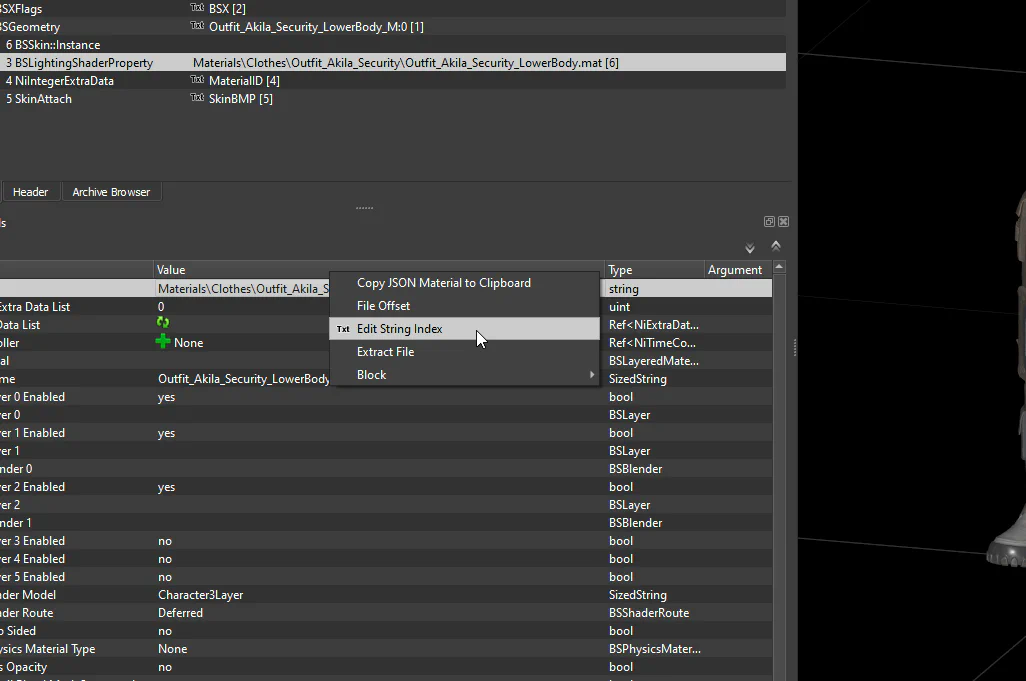
If it is incorrect, uncomplete, or wrong, just change it to correct .mat path for your mesh (by either copypasting from original mesh or in any other way), by richt clicking on it and selecting “Edit String Index”.
If one or more of your outfit parts have cloth physics, don’t forget to copy NiClothExtraData node from original .nif file.
Clarification: you CAN make your own physics from scratch if you wish, as we got awesome Havok Physics Editor tool. But if you simply refit armor to another body for ex., it makes no sense to put effort to doing full graph, bones, sim cloth mesh and setting it all up.
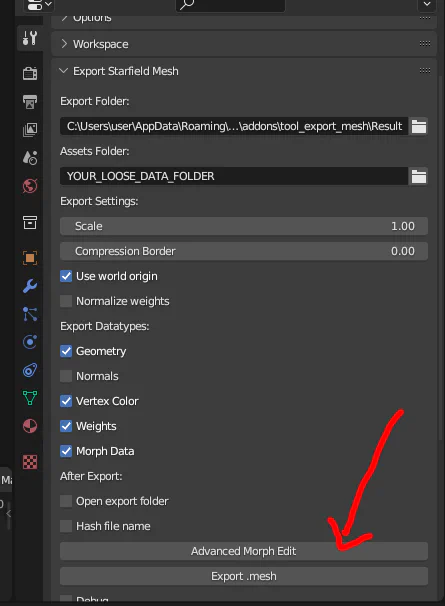
Starfield morphs include vertex normals in morph files, unlike any previous BGS game, which means when you export .dat file from a single mesh with shape keys, it doesn`t know how to handle normal vectors for each morph. To avoid bad vertex normals after export, I use “Advanced Morph Edit” feature which separates every morph to a new object with it’s own vertex normals data.
Select outfit part you want to export .dat file for (it should have all the shape keys already as we transferred them from reference mesh before).
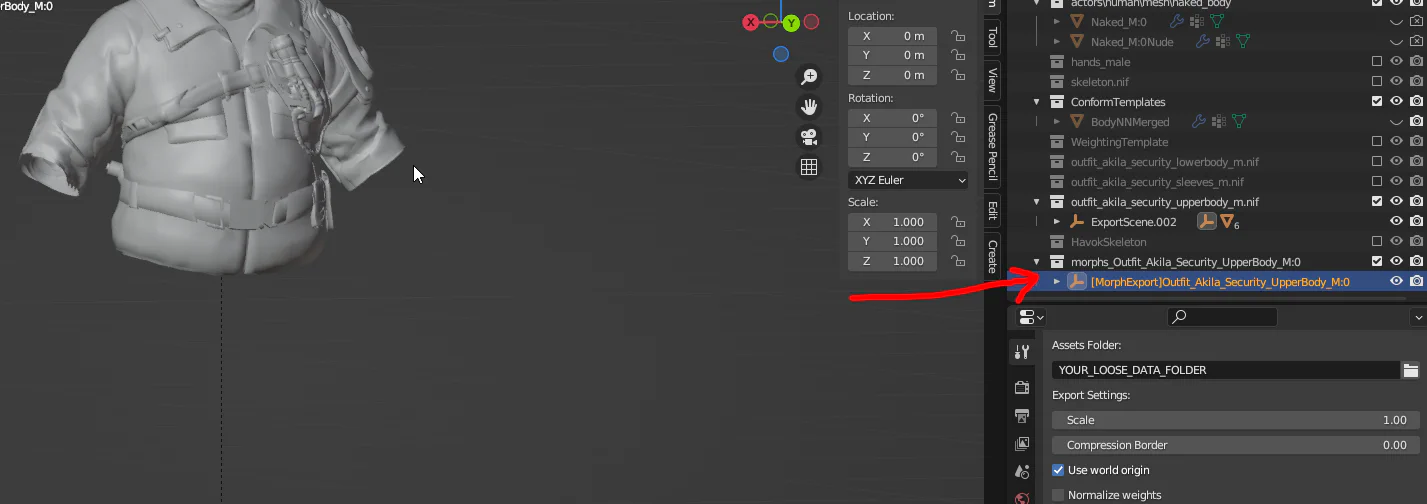
Click “Advanced Morph Edit”:
Select Root node of objects generated from your mesh:
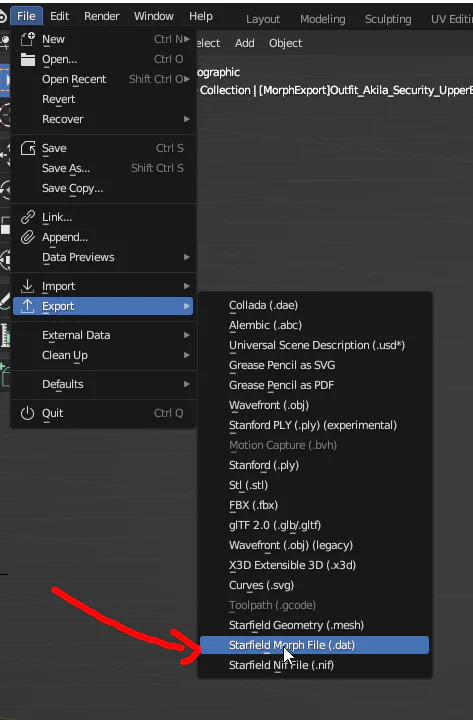
Go to File -> Export -> Starfield .dat file:
Repeat process for all parts of your outfit.
Morph files are stored in meshes/morphs/your-outfit-dat-file-folder. You set-up morph record for armor in either CK or xEdit - MOPRH (Morphable Object) now is part of Armor Addon record, and MOPRH record is a new record type now, it’s not found automatically. You set folder path in MORPH, and your morph file always has to be named “morph.dat*.
If everything went good, you should now have properly exported .nif file/s and .dat morphs. You can test it in game now to see if mesh behaves normalle and if morphs work (best way to test moprhs is CharGenMenu and slm player/slm player 2).
(Only relevant for external geometry .nifs) Wrong Geometry path in .nif file, or missing geometry file.
Mesh is invisible.
Mesh has weighting to a bones that aren’t present in game skeleton.
This is common if mesh had SimClothData before import to Blender and you didn’t tick “Load Havok Skeleton”, because mesh is weighted to Havok skeleton bones, which you didn’t import. Thus, you have a mesh that has weighting but has no bones to solve it.
Often, you want to refit armor piece that is both revealing and has parts with cloth physics data. It may become confusing, as Robert S also use non-vanilla skeleton.
So, you have to remember:
Outfit part that has cloth physics data must use it’s own Havok skeleton that is imported alongside Load Havok Skeleton.
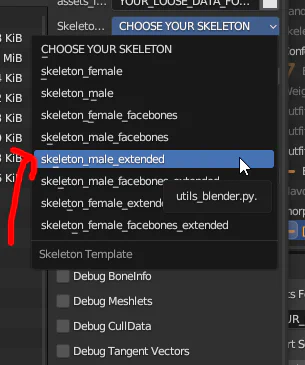
Robert S skin parts should use Extended skeleton, which is either provided in reference .blend file, or you can choose it when you import .nif:
If you make cloth physics from scratch, I advice just to use Extended skeleton as a base for Havok skeleton and add cloth bones to it.